Guides
For this overview I am loading the following sub mods and only these. Support will not be provided for any conditions outside of this blackbox setup. There is no way to support the millions of mod interactions and load order hijinks that can occur.
BTSE Sub Mods are added in this load order.
BTSE_Base
BTSE_Economy
Later we will be discussing adding a custom mod when creating global shop items, that will obviously be last in the mod order.
Vocabulary and Terminology
Vending Machines - For all intents and purposes this is a shop
Cash - Any type of currency that a player can have “on them” and send directly to other players without an ATM.
Tessera - Made up currency name used for examples here
Sandbox Options
I will be discussing all sandbox options that could have an effect on different parts of the economy subsystem.
BTSE | Core Settings
This directly affects any containers that an admin updates to a vending machine. Once an admin has set a container to be a vending machine, everyone in the area must leave the area and come back for this setting to take full effect. This is due to Zomboid code, we suggest 3-4 cells away.
The best example of this is in the Money -> Wire to someone you met recently tab
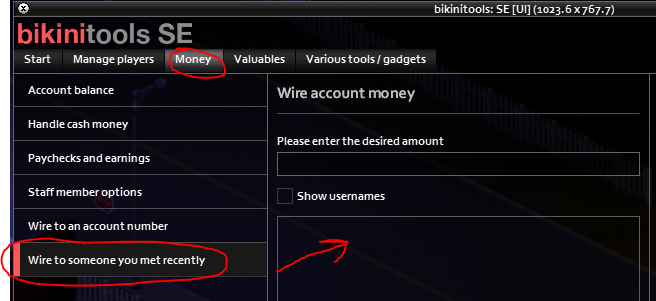
Depending on how you display user’s names on your server you could change this. In an RP heavy server such as Project Apocalypse the first/last name of the specific character is shown, so they would check this. While, A Path Above on the other hand, simply uses usernames and would uncheck this.
BTSE | Economy
This is the user facing name for the main currency.
An example:
After defining a new currency, you can define it to have a Cash stream as well. All currencies defined here will have a new stream prefixed with cash_ like the existing cash_primary.
After defining a new currency, you can define it to have a Cash stream as well. All currencies defined here will have a new stream prefixed with cash_ like the existing cash_primary.
As an example, I’ve defined a new currency (we’ll go into more detail about creating currency later). If I want to have a cash stream, I would define that here and it would look like the following.
Now, players can trade that currency directly by right clicking on a player directly.
This one is pretty straight forward, this defines the maximum number of tiles between two players for a cash transfer. Like you were handing them paper money.
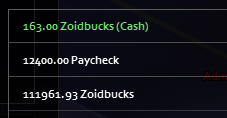
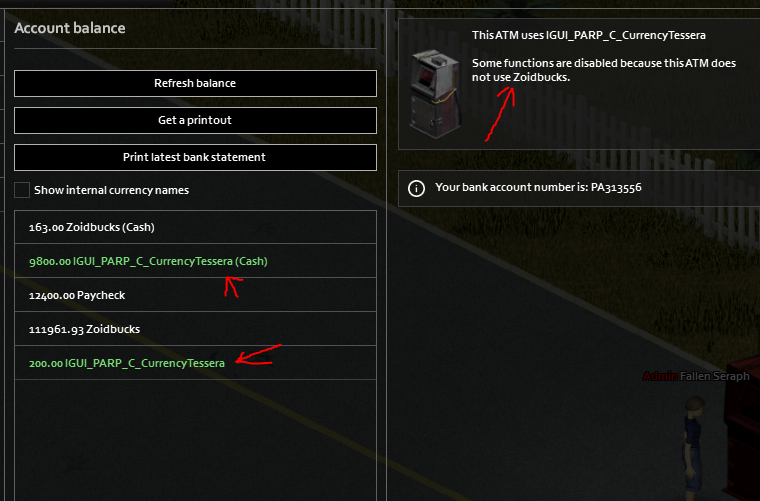
Any money that’s not deposited at an ATM will be lost on death, you can see the difference in the Account Balance of the UI. If I were to die with the following balance
I would lose 163.00 Zoidbucks and 9800 Tessera (we’ll fix the labels later)
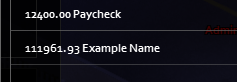
This takes all forms of cash money and puts it in a wallet on the corpse.
For example, if I died with this balance sheet the wallet on my corpse would have 163.00 Zoidbucks and 9800 Tessera in it. (we’ll fix the labels later)
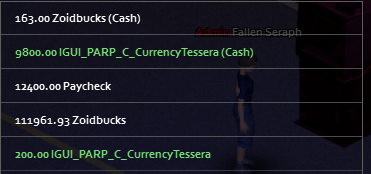
This option will remove a percentage of bank account funds on death.
For example, if I set it to 10% and die. I will lose 11196.19 Zoidbucks and 20 Tessera
BTSE | Player goodies
Enables the bounty system that pays out by default between 1 and 10 cash of the primary currency at a 10% chance for each zombie kill.
Allows you to change which currency the bounty system pays out.
Example:
Randomizes bounty payout currencies based on those defined in previously mentioned setting (also shown below).
Percentage chance for a bounty to pay out when a zombie dies.
This is the minimum amount of currency paid when a bounty is paid out.
This is the maximum amount of currency paid when a bounty is paid out.
Enables the paycheck system. Which will deliver paychecks in the primary currency every n amount of time logged in on the server. As defined in the following settings.
Where you define the amount paid with each paycheck.
The actual amount of primary currency given per paycheck.
BTSE | Banking
The owner of the bank. This person will receive all bank fees applied to ATM transactions. A name here is required for bank fees to be applied.
You can set it to an admin or if you set it to something random like zzzzzzz or asdfohiurh it’ll just go into an empty account.
% of fees applied to ATM transactions and sent to the bank owner
Logs transactions under their own category when paychecks are redeemed through the UI. If you have the chat system installed you can use /paycheck to redeem.
This value precedes the account number.
Example: PA121212
Example: ZE121212
Defines the number of digits that come after the prefix characters.
Bank main office allows any ATM functions in the defined area without an ATM.
Maximum distance a person can stand from an atm and interact with it.
Interest applied to banked money every paycheck. This will only be applied to primary by default. Other currencies can be defined in the next setting.
Other currencies that can accrue interest, if we wanted our example currency to accrue interest we’d put it here.
Example:
Allows players to exchange valuables anywhere without an ATM.
Allows valuables to be exchanged at any atm without defining that option at each atm.
Allows paychecks to be redeemed at any atm without defining that option at each atm.
Adds the account balance document to a player’s inventory instead of posting it in chat.
BTSE | Shops and zoning
This person will receive all taxes applied to paychecks and item sales. A name here is required for bank fees to be applied.
You can set it to an admin or if you set it to something random like zzzzzzz or asdfohiurh it’ll just go into an empty account.
% of taxes applied to shop transactions and paychecks and sent to the tax receiver
Shows taxes under their own category in statements, still redeemed with paychecks.

Defines an area where you can purchase vehicles from the global shop without a terminal.
The minimum distance to a vending machine where you can purchase a vehicle.The vehicle will spawn directly on the player who purchases it, so it’s best to have some distance away from the machine so cars don’t clip into it.
The maximum distance to a vending machine where you can purchase a vehicle.
Changes the preview picture size in the UI.
Prevents players from buying cars inside rooms which can cause issues.

Allows players to purchase cars and vehicles without a shop terminal or other vending machine.
Maximum distance a player can be away from a shop terminal or vending machine to purchase items.
The ATM
Setting up an ATM
Placing a new ATM
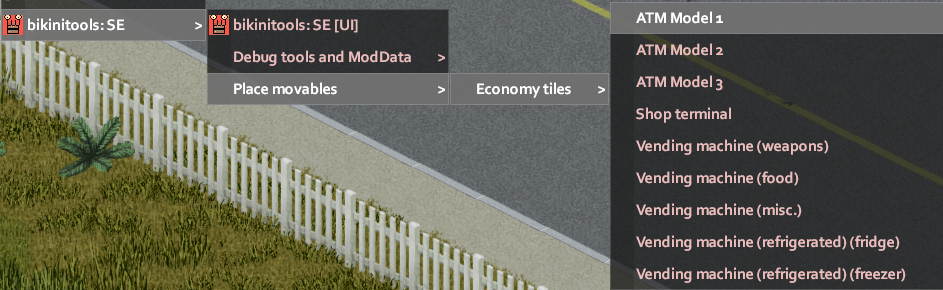
Once an ATM is placed, you can then update the firmware by right clicking on the ATM and choosing Firmware update.
By default you’ll see the following menu. These are the default settings for every ATM placed.
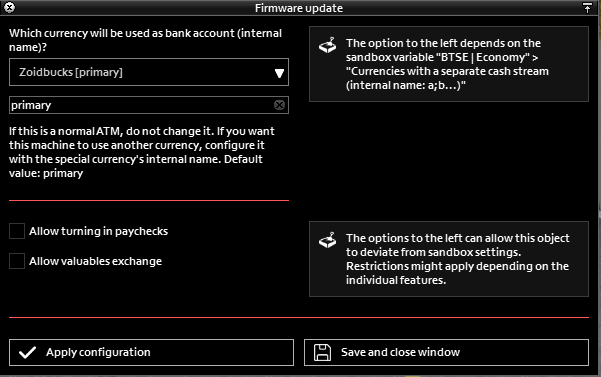
As with most settings screens Apply will apply the configuration without closing the window, save and close will save and close.
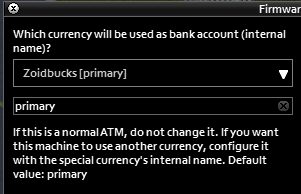
Each ATM handles its own currency, by default that’s primary. If you want an ATM to handle a different currency you change it in the drop down.
Note: A currency must exist before it is available in the drop down, we’ll discuss this later.
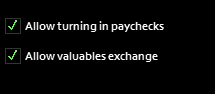
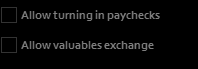
The two check boxes will make an ATM available to perform these tasks.
Note: The above settings are ignored if you have any of the below global sandbox options checked.
An example of a secondary currency using our tessera currency.
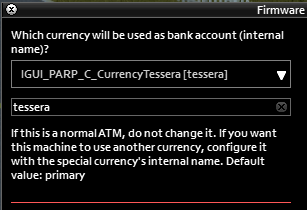
Note: Using a non-primary currency then disables this ATM from turning in paychecks or allowing valuable exchanges because those only return the primary currency.
Functions in the UI that require an ATM will have a label stating such.

Things to Note
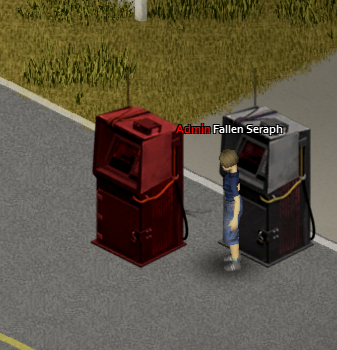
If you have multiple currencies you will need an ATM for each currency. Example below using our tessera currency.
The system will do its best to select the closest ATM and will remain locked on that one until the player travels out of the max tile range (second screenshot below). It’s best in most cases to space ATMs out slightly.
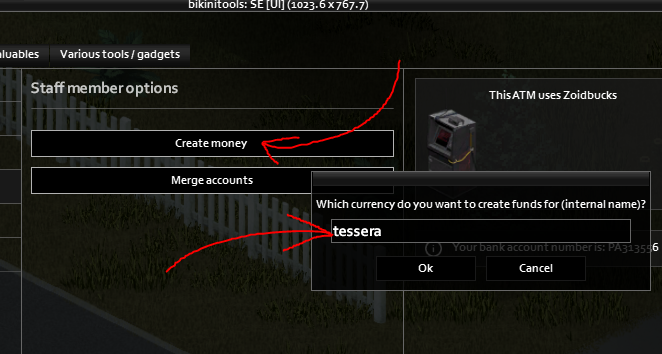
Creating new currency
- Create an ATM and leave the firmware default.
- Open the UI -> Money -> Staff member options
- Specify the new currency internal name
- Create any amount greater than 0
- ATMs can now be set as that currency since it exists.
ValuesAndPrices.lua
I’m going to transition here into setting up a custom mod and explaining the parts of ValuesAndPrices and then we’ll discuss the global shop, player shops, and vehicle shops.
Please note, I’ll be adding 3 new mods to the load order, the entire load order is now. I’m including damnlib and the M998 to be used as examples, they are not required. The last mod is the example mod I’ll be loading which will include the ValuesAndPrices.lua. This VlauesAndPrices.lua was taken from Bikini’s Example mod under media/lua/shared/ValuesAndPrices.lua
BTSE_Base
BTSE_Economy
damnlib
92amgeneralM998
Fallens_Guide_Mod
Defining exchangeable values
From the example page you can see the included definition.
BTSE.Economy:addValuablesEntry("Base.Money", 1);Let’s make another. This time we’ll give players 10 money for exchanging a box of .38 Special Rounds.
BTSE.Economy:addValuablesEntry("Base.Bullets38Box", 10);Note: It’s important to note that the module is REQUIRED for the item. Module.ItemType
The next screenshot is what it looks like in vs code.

This is what the Valuables tab looks like now.

Note: Valuables ONLY return the primary currency.
Defining vehicles purchasable from the global vehicle shop.
We’ll start with the vanilla vehicle Base.CarNormal
To create this shop entry we’ll use the following code.
BTSE.Economy:addVehicleShopEntry("Base.CarNormal", {
    ["cash_primary"] = 5000,
});
This will create the shop entry and set the price of the car to 5000 cash of the primary currency.
You can add multiple types of currency here as well.
Note: The currency at the top of the list is used first if a player has enough of each currency.
BTSE.Economy:addVehicleShopEntry("Base.CarNormal", {
    ["cash_primary"] = 5000,
    ["primary"] = 6000,
    ["tessera"] = 3000,
});
You can also add a custom description of the vehicle.
BTSE.Economy:addVehicleShopEntry("Base.CarNormal", {
    ["cash_primary"] = 5000,
}, {
    description = "A really normal car"
});
This also accepts IGUI for translations.
BTSE.Economy:addVehicleShopEntry("Base.CarNormal", {
    ["cash_primary"] = 5000,
}, {
    description = "IGUI_Fallenstestmod_normalcardesc"
});
Note: So far when someone buys a car, it will follow the Sandbox Option “General Condition” under the vehicles tab.

Now, let’s get a bit more dynamic with how the vehicles come out of the shop.
We can have a car be fully repaired as it spawns with the repairAllParts option.
Note: This does not add parts to cars.
BTSE.Economy:addVehicleShopEntry("Base.CarNormal", {
    ["cash_primary"] = 5000,
}, {
    description = "IGUI_Fallenstestmod_normalcardesc",
    repairAllParts = true,
});

We’re going to change the vehicle here to KI5’s M998 General Humvee.
Next we’re going to look at the addSpecialParts option.
BTSE.Economy:addVehicleShopEntry("Base.92amgeneralM998", {
    ["cash_primary"] = 35000,
    ["primary"] = 40000,
}, {
    addSpecialParts = {
        ["M998Bullbar"] = "Base.M998Bullbar2_Item",
        ["M998Roofrack"] = "Base.M998Roofrack1_Item",
        ["M998Muffler"] = "Base.M998Muffler2_Item",
    }
});
This allows you to specify which part can be installed into which vehicle slot. To spell out the option above [“M998Bullbar”] is the item slot and "Base.M998Bullbar2_Item" is the item itself. As a reminder you need both the module and the item type itself, so Module.itemtype.
Once you have specified new items to be installed you can include repairAllParts to have all of these the original items and the newly added items to be 100% on spawn.
BTSE.Economy:addVehicleShopEntry("Base.92amgeneralM998", {
    ["cash_primary"] = 35000,
    ["primary"] = 40000,
}, {
    repairAllParts = true,
    addSpecialParts = {
        ["M998Bullbar"] = "Base.M998Bullbar2_Item",
        ["M998Roofrack"] = "Base.M998Roofrack1_Item",
        ["M998Muffler"] = "Base.M998Muffler2_Item",
    }
});
A couple of other options worth mentioning are skinIndex and thumbnailPath.
BTSE.Economy:addVehicleShopEntry("Base.92amgeneralM998", {
    ["cash_primary"] = 35000,
    ["primary"] = 40000,
}, {
    repairAllParts = true,
    addSpecialParts = {
        ["M998Bullbar"] = "Base.M998Bullbar2_Item",
        ["M998Roofrack"] = "Base.M998Roofrack1_Item",
        ["M998Muffler"] = "Base.M998Muffler2_Item",
    },
    skinIndex = 6,
    thumbnailPath = "media/ui/example/nomad-humvee.png",
});
The skinIndex allows you to force a vehicle to spawn with a specific skin available to it. The index starts with 0.
The thumbnailPath allows you to specify a different thumbnail to load for this sale vehicle.

Defining items purchasable from the global vehicle shop.
Let’s first define an item to be sold for a single currency.
BTSE.Economy:addItemShopEntry("Base.Money", {
    ["cash_primary"] = 1,
});
This creates a shop entry for 1 vanilla money item that costs 1 cash of the primary currency.
Like vehicles you can also add multiple currencies. The first currency listed is the one with priority.
BTSE.Economy:addItemShopEntry("Base.Money", {
    ["cash_primary"] = 1,
    ["primary"] = 1,
});
You can also add an amount modifier to the item entry.
BTSE.Economy:addItemShopEntry("Base.Money", {
    ["cash_primary"] = 5,
}, {
    amount = 5,
});
This will return 5 of the item for that listed price.

